
Saturday, July 9, 2011
Under Bar Sink Plumbing
After I ripped out the old cabinets, I reconfigured the plumbing under the bar sink to accommodate the Hot & Cold for the Sink, to run a cold line to the aquarium sump for evaporation top offs, and cold water to the under cabinet freezer ice maker, and cold water for refilling my aquarium for water changes. I don't use the ice maker however the connections are there but not connected to the line. When I have to add water to my aquarium the hose is right there ready to go with a nice big handled ball valve and when I'm done it coils back up onto a paper towel holder arm. The valves for the sink hot and cold and for the aquarium and ice maker lines are all nice 1/4 turn ball valves - the only way to go.


New Laundry Room Exterior Door
I replaced the laundry room exterior door. I put window film on the glass to cut UV (Don't want to fade the Spinone Revolution Poster I made.) and reduce heat. I still need to finish the frame around the door on the inside - but first I need to finish the laundry room tile and slate baseboards. I will also put slate around the door frame. Amazingly, I got Jim to help bring the door in and hold it up while I leveled everything and got the initial screws in to hold it in place. I greatly appreciated his help. His policy is that I am to never ask him to help with manual labor on MY projects. I painted, stained and polyurethaned the door in place since it is an exterior out-swing the rod in the hinges do not come out and I didn't want to remove the hinges from the frame.
I initially planned to hang the door myself, then decided to pay someone but he never got back to me soon enough so I went ahead an did the work myself (Easy to do and really not worth paying someone else). Since I still have the exterior door down to the garage to hang, the money I saved can buy me a new tool or two :-). Of course Jim said I could give it to him for his labor.
Exterior: Sideways blowing monsoon rain and winds has already gotten the outside dirty. I installed window film on the glass panes to block UV and reduce heat when the early morning sun hits the window. I didn't want to fade the Spinone Revolution Poster that I made hanging in the laundry room.

Interior: (Still tiling the floor & baseboards so I haven't done around the door frame.)

I initially planned to hang the door myself, then decided to pay someone but he never got back to me soon enough so I went ahead an did the work myself (Easy to do and really not worth paying someone else). Since I still have the exterior door down to the garage to hang, the money I saved can buy me a new tool or two :-). Of course Jim said I could give it to him for his labor.
Exterior: Sideways blowing monsoon rain and winds has already gotten the outside dirty. I installed window film on the glass panes to block UV and reduce heat when the early morning sun hits the window. I didn't want to fade the Spinone Revolution Poster that I made hanging in the laundry room.

Interior: (Still tiling the floor & baseboards so I haven't done around the door frame.)

Friday, July 8, 2011
Bar Area Remodel
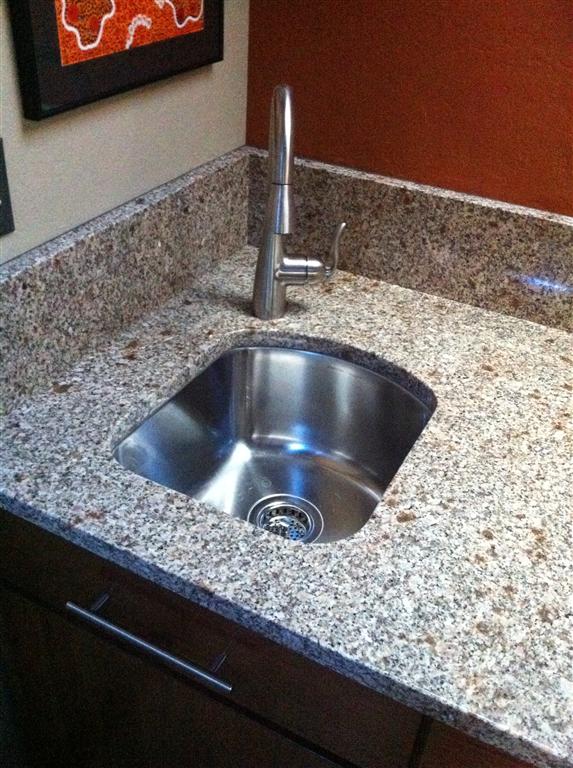
I ripped out the old bar cabinets and replaced them with solid Cherry slab doors and face-frames and solid plywood bases. I installed a new sink and bar faucet. I put in another electrical outlet for the Sub-Zero refrigerator/freezer drawers. The granite is 1 1/4" (3cm) thick slab of Santa Venetia discussed in an earlier post. I has a simple yet contemporary double eased edge put on the granite.
 Sink:
Sink:
 Granite Detail: (bluish line in the upper left is a reflection from the aquarium lights)



Drawer/Door Solid Slab Detail:

Sunday, June 26, 2011
Monster Fish Tank - 450 Gallon Tank
On 5Nov2010 I drove up to Phoenix to pick up the custom aquarium I ordered the first of August. It is a 450 gallon acrylic tank that is 8 feet long, 2.5 feet wide, and 3 feet tall. The stand is a steel frame with a wood facade and the canopy is wood designed to my specifications since I didn't like they way they normally build canopies. The total weight of just the aquarium, stand and canopy is approximately 500 lbs. I seem to have lost some of my pictures documenting the aquarium adventure so these will have to do.
UHaul with large pallets fit to level floor above wheel well:
 It took five guys to bring the stand and tank inside the house and to position it (Once it was in place there was absolutely no way for me to budge it even when empty.. Since it was too wide to fit through the garage door it had to come through the front. This meant that it had to be lifted up and over the front wall. The stand cleared the door by a 1/2 inch on each side and the tank by a full inch and a half. Whew! But if it didn't clear they could have come in through the sliding doors further down on the porch.
Laying out slate for back inside of tank:
First slate tiles are split into thin pieces by using a putty knife to work into a crack on the edge and then working a string and two putty knives to slowly separate the slate keeping the pieces as large as possible. Pliers are then used to nip the slate to dry fit it all together. I drew the outline of the sections in red pencil on the garage floor so I would know how big to make each mosaic. A picture is taken of each section and the pieces are stacked in order to aid in reassembly in the tank.

 Slate is attached with 100% silicon caulk to inside back. A ladder is used to get inside the tank. Towels are used to protect the acrylic sides and top from scratching while climbing in and out.
Finished Slate background:
 Pictures to Indicate Scale:

 Rocks: The rocks are tumbled flagstone and some custom caves. I made the caves by spraying ABS elbows, Y's, or straights with spray polyurethance foam. After the foam cures it is cut and shaped. It is important to roughen all surfaces. The pieces are then coated with a paint consistency sandstone grout. While the grout was still wet other shades of grout in powder form are sprinkled on to add shading effects. The pieces are kept sprayed to keep moist during curing. Once cured they are soaked in water for days to leached out what ever is going to leach out. I took photos to document all of these steps but can't find them.
Dry stacking to determine layout: The flagstone was dry stacked on a big piece of cardboard marked with the size of the tank bottom.

Finished rock work:

 Finished rocks with gravel added:
 Plumbing:


 The Tank: I had a tank disaster while on vacation for 3.5 weeks and had to practically restock my tank all over again after losing many fish. Luckily X-Tilt, the big Frontosa, survived.
 My whole tank pictures are not too great due to reflections from windows and lights.
Here is a video I took with my iPhone:
The tank is mostly African Cichlids with a bunch of Clown Loaches (because they are cool and they sleep on their sides) and five Bichirs (Polypterus senegalis), a very large Plecostomus and a large Synodontis catfish. As is typical with aggressive cichlids the final inhabitants will be determined by what survives together and doesn't get killed and left to float or eaten.
UHaul with large pallets fit to level floor above wheel well:

Laying out slate for back inside of tank:
First slate tiles are split into thin pieces by using a putty knife to work into a crack on the edge and then working a string and two putty knives to slowly separate the slate keeping the pieces as large as possible. Pliers are then used to nip the slate to dry fit it all together. I drew the outline of the sections in red pencil on the garage floor so I would know how big to make each mosaic. A picture is taken of each section and the pieces are stacked in order to aid in reassembly in the tank.


Finished Slate background:


Dry stacking to determine layout: The flagstone was dry stacked on a big piece of cardboard marked with the size of the tank bottom.

Finished rock work:


Here is a video I took with my iPhone:
The tank is mostly African Cichlids with a bunch of Clown Loaches (because they are cool and they sleep on their sides) and five Bichirs (Polypterus senegalis), a very large Plecostomus and a large Synodontis catfish. As is typical with aggressive cichlids the final inhabitants will be determined by what survives together and doesn't get killed and left to float or eaten.
Monday, June 20, 2011
Future Posts Line Up
Since I have had many projects going on that are not completely finished for posting, here is the future post line up (in no particular order) of projects and new items.
- Downstairs tile flooring
- Monster fish tank - 450 gallons - Update: Posted 26Jun2011
- Bar area cabinets and undercounter drawer refrig/freezer - Update: Posted 8Jul2011
- Landry room cabinets
- Exterior door in laundry room - Update: Posted 9Jul2011
- Exterior door to garage
- Bat house
- Solitary bee house
- Carnivorous plants
- Anything else that comes up

Subscribe to:
Posts (Atom)
.jpg)