Thursday, December 29, 2011

New Terrarium - Part One

This is part one of a multi-part post on the terrarium. I decided to build a new terrarium for my tiger salamanders. I bought an Exo-Terra Large Tall Terrarium (36"x18"x24" LxWxH). I cut glass and made a 12"x12" by 5 1/4 " deep water area. I drilled three holes with diamond hole bits in the bottom for bulkheads. One for an overflow in the water area, one for the return via a waterfall, and one in the land area to drain excess water accumulation as needed if the soil becomes over saturated. I also used plexiglass to make an underground cave whose side view can be seen from the front.

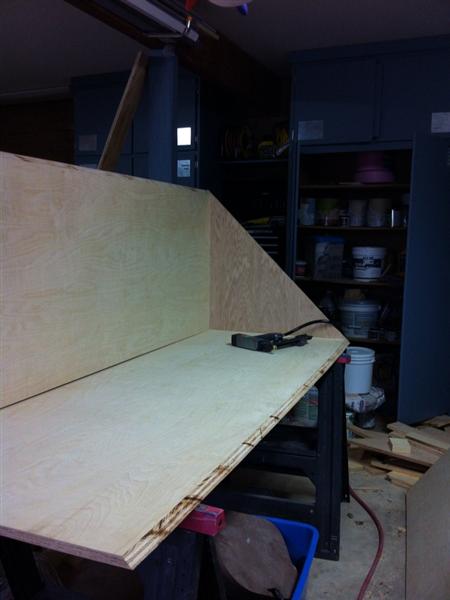
I built a stand for both the big terrarium and for a smaller 12'x12" cube terrarium. The bottom of the stand will hold the sump biological filter.

Partially built stand: (Doors not made yet and still to be finished.)
I wanted the water from the sump to return via a waterfall. I carved out the water fall in green blocks of craft styrofoam. I used a long drill bit to make the hole for the waterfall water return pipe. A deeper pool was made by cutting a hole to hold a plastic hospital cup (painted black on outside). After carving the water fall I tested the water flow with a hose to make sure the water flowed the way I wanted before proceeding to the next step. Once finished the rim around the cup and return pipe are sealed with 100% silicon.

Waterfall carved in styrofoam:


To make the waterfall look natural and to make it waterproof, the first step is to coat it with sandstone color sanded grout. The grout is thin enough to paint on the foam. After the first coat drys, a second coat is applied. While the second coat is still wet, dry powdered grout in the colors natural gray, moss green, copper, and new taupe are applied to make the rock look realistic. The dry grout adds shadows and shading.

First Coat of sandstone grout painted on foam:

After the grout coatings on the waterfall are dry, it is coated in clear coat System Three epoxy.

The epoxy clear coated waterfall (still wet):


The finished waterfall attached with silicon in the terrarium. The exposed silicon is covered with coco fiber by pressing the coco fiber into the silicon. The area above the water fall is treated with slate pieces (Thin slate layers separated from larger flooring tiles).
The back of the terrarium is covered with Zoo Med real bark panels, sphagnum and coco husk fiber. The back and left side walls of the water area are covered with thin slate plates siliconed to the glass. Two ramps and a small platform are created with slate tile and siliconed into place. Traction is added to the ramps by siliconing large aquarium gravel and small pebbles to the ramps. The overflow tube is also coated with aquarium gravel.

Three clay orchid pots (have side drainage holes) were cut in half with a tile saw and then glued to the back wall to hold plants higher on the back wall.
The vines are exo-terra large and small vines. The bottom of the tank has a layer of hydroton clay balls covered with black sunshade cloth. The substrate is ground coco husk fiber. Various ferns, bromeliads, an orchid and ivy are planted. Sheet sphagnum, live moss and lichens are added to complete the natural terrarium.


The back is spray painted black. The two sides are masked off to spray paint the exposed side of the waterfall and cork black. The front of covered with 3M black vinyl stick on to cover the exposed dirt leaving the water area and cave side visible.

Dog House LED Rope Lights

Since it gets dark early I decided Fringe would like to have some LED rope lights on her dog house. Now she has some light at night on the evenings I come home after dark or go out at after dark.

Samsung LCD TV Self Repair - Capacitor Replacement

My Samsung LCD TV started showing colored spots which would go away after turning off and then back on. Then they got worse becoming spots and streaks and the problem wasn't completely going away after turning off and then on again. It also started taking longer to turn on. A colleague at work had the same problem and fixed the problem by replacing capacitors. A quick Google search revealed this was an easily repairable by replacing capacitors on the power board.

Once the back cover is removed, the power board is under the metal cover:
The cover over the power board was removed:
Close up of power board: (The bad capacitors are in the upper right corner)
Bad Capacitors: (Bulging and leaking tops)
I desoldered the bad capacitors and bought replacement capacitors that had the same capacitance but higher voltage rating. The new capacitors were slightly larger but still fit.

Soldering job before and after trimming leads:

The new Capacitors:

The cables were reconnected, power board cover and back cover were replaced. The TV is good as new and functions perfectly.

Sunday, August 28, 2011

Recessed Pulls for Laundry Room

I have finished installing the recessed pulls as mentioned in the previous post on the finished laundry room. The drawer and cabinet door in the corner required flush pulls to prevent obstruction of the pullout next to the dryer.

  
Router template used to cut recess in wood:
 Routed recess for pull:
 Construction Glue to hold pulls in place:
Installed pulls:


Sunday, August 14, 2011

Laundry Room

All of the major work for the laundry room is finished. I thought I had before pictures but I don't. The original laundry room configuration had a floor to ceiling cabinet against the block wall 90 degrees to the dryer. This created a large open space in the corner that had zero access. It was a waste of space and only collected dog hair and dust. I reconfigured the cabinets and layout. Now the cabinets above the washer and dryer are 2 ft deep rather than the original 1 ft. Base cabinets and uppers were placed along the block wall. The upper corner cabinet is a face frame that bridges the cabinets on each side but the self inside is custom since a sloped upper wall prevented a standard cabinet.The laundry now has a counter top with LED under cabinet lighting and the corner is not wasted space. The opposite angled corner cabinet was larger than normal corner cabinets so I built the base frame unit myself and ordered a faceframe and trim. The cabinets are the same solid cherry slab cabinets and granite counter tops used in the bar area (from earlier post: Bar Area Remodel).

The tile is the Adino Noche travertine and the baseboard and trim is multicolor slate. This is the same tile as the rest of the new tile downstairs. I poured a raised slab for the washer and dryer. The raised slab keeps dog hair and dust bunnies from blowing across the floor and getting underneath the washer and dryer.

View from Kitchen:
 The drawer and cabinet door you see closest to the dryer still need to have recessed pulls installed. They have to be recessed to allow the pullout next to the dryer to come out without hitting handles. I have everything to install the pulls I just need to make a template for the router and then cut out the recessed pocket in the drawer and door.

These are the future pulls: Linnea - brushed stainless steel. The drawer pull will be horizontal and the door pull will be vertical and a little longer than the one for the drawer. Stay tuned for a future post with the installed pulls.
View from the exterior door to the ramada: See the raised washer & dryer

 Custom Corner Cabinet with matching face frame: The door is also new (New Laundry Exterior Door).
Building the corner cabinet base:


After the cabinet was finished I drilled the holes for the shelf supports and cut out the shelves. The fixed shelf was installed after the face frame to ensure alignment.

Saturday, July 9, 2011

Under Bar Sink Plumbing

After I ripped out the old cabinets, I reconfigured the plumbing under the bar sink to accommodate the Hot & Cold for the Sink, to run a cold line to the aquarium sump for evaporation top offs, and cold water to the under cabinet freezer ice maker, and cold water for refilling my aquarium for water changes. I don't use the ice maker however the connections are there but not connected to the line. When I have to add water to my aquarium the hose is right there ready to go with a nice big handled ball valve and when I'm done it coils back up onto a paper towel holder arm. The valves for the sink hot and cold and for the aquarium and ice maker lines are all nice 1/4 turn ball valves - the only way to go.

New Laundry Room Exterior Door

     I replaced the laundry room exterior door.  I put window film on the glass to cut UV (Don't want to fade the Spinone Revolution Poster I made.) and reduce heat. I still need to finish the frame around the door on the inside - but first I need to finish the laundry room tile and slate baseboards. I will also put slate around the door frame. Amazingly, I got Jim to help bring the door in and hold it up while I leveled everything and got the initial screws in to hold it in place. I greatly appreciated his help. His policy is that I am to never ask him to help with manual labor on MY projects. I painted, stained and polyurethaned the door in place since it is an exterior out-swing the rod in the hinges do not come out and I didn't want to remove the hinges from the frame.
     I initially planned to hang the door myself, then decided to pay someone but he never got back to me soon enough so I went ahead an did the work myself (Easy to do and really not worth paying someone else).  Since I still have the exterior door down to the garage to hang, the money I saved can buy me a new tool or two :-). Of course Jim said I could give it to him for his labor.

Exterior: Sideways blowing monsoon rain and winds has already gotten the outside dirty. I installed window film on the glass panes to block UV and reduce heat when the early morning sun hits the window. I didn't want to fade the Spinone Revolution Poster that I made hanging in the laundry room.

Interior: (Still tiling the floor & baseboards so I haven't done around the door frame.)

Friday, July 8, 2011

Bar Area Remodel

I ripped out the old bar cabinets and replaced them with solid Cherry slab doors and face-frames and solid plywood bases. I installed a new sink and bar faucet. I put in another electrical outlet for the Sub-Zero refrigerator/freezer drawers. The granite is 1 1/4" (3cm) thick slab of Santa Venetia discussed in an earlier post. I has a simple yet contemporary double eased edge put on the granite.

Sink:
Granite Detail: (bluish line in the upper left is a reflection from the aquarium lights)
Drawer/Door Solid Slab Detail:

Sunday, June 26, 2011

Monster Fish Tank - 450 Gallon Tank

On 5Nov2010 I drove up to Phoenix to pick up the custom aquarium I ordered the first of August. It is a 450 gallon acrylic tank that is 8 feet long, 2.5 feet wide, and 3 feet tall. The stand is a steel frame with a wood facade and the canopy is wood designed to my specifications since I didn't like they way they normally build canopies. The total weight of just the aquarium, stand and canopy is approximately 500 lbs. I seem to have lost some of my pictures documenting the aquarium adventure so these will have to do.

UHaul with large pallets fit to level floor above wheel well:

It took five guys to bring the stand and tank inside the house and to position it (Once it was in place there was absolutely no way for me to budge it even when empty.. Since it was too wide to fit through the garage door it had to come through the front. This meant that it had to be lifted up and over the front wall. The stand cleared the door by a 1/2 inch on each side and the tank by a full inch and a half. Whew! But if it didn't clear they could have come in through the sliding doors further down on the porch.

Laying out slate for back inside of tank:
First slate tiles are split into thin pieces by using a putty knife to work into a crack on the edge and then working a string and two putty knives to slowly separate the slate keeping the pieces as large as possible. Pliers are then used to nip the slate to dry fit it all together. I drew the outline of the sections in red pencil on the garage floor so I would know how big to make each mosaic. A picture is taken of each section and the pieces are stacked in order to aid in reassembly in the tank.
Slate is attached with 100% silicon caulk to inside back. A ladder is used to get inside the tank. Towels are used to protect the acrylic sides and top from scratching while climbing in and out.

Finished Slate background:
Pictures to Indicate Scale:

Rocks: The rocks are tumbled flagstone and some custom caves. I made the caves by spraying ABS elbows, Y's, or straights with spray polyurethance foam. After the foam cures it is cut and shaped. It is important to roughen all surfaces. The pieces are then coated with a paint consistency sandstone grout. While the grout was still wet other shades of grout in powder form are sprinkled on to add shading effects. The pieces are kept sprayed to keep moist during curing. Once cured they are soaked in water for days to leached out what ever is going to leach out. I took photos to document all of these steps but can't find them.

Dry stacking to determine layout: The flagstone was dry stacked on a big piece of cardboard marked with the size of the tank bottom.

Finished rock work:

 Finished rocks with gravel added:
Plumbing:


 The Tank: I had a tank disaster while on vacation for 3.5 weeks and had to practically restock my tank all over again after losing many fish. Luckily X-Tilt, the big Frontosa, survived.
My whole tank pictures are not too great due to reflections from windows and lights.

Here is a video I took with my iPhone:

The tank is mostly African Cichlids with a bunch of Clown Loaches (because they are cool and they sleep on their sides) and five Bichirs (Polypterus senegalis), a very large Plecostomus and a large Synodontis catfish. As is typical with aggressive cichlids the final inhabitants will be determined by what survives together and doesn't get killed and left to float or eaten.